Guest Wi-Fi access has become an expected amenity in virtually every business environment — from hotel lobbies and coffee shops to corporate offices, medical surgeries, and retail spaces. However, providing open, uncontrolled internet access to visitors creates significant security, legal, and compliance risks. A captive portal solves this problem by requiring guests to authenticate, accept terms and conditions, or register before accessing the network, while simultaneously keeping guest traffic completely separated from your corporate systems.
Cisco Meraki has established itself as one of the leading platforms for business Wi-Fi in the United Kingdom, with its cloud-managed approach making it particularly popular among SMEs and multi-site organisations. Meraki's built-in captive portal functionality allows you to create professional, branded guest access experiences without additional hardware or software — everything is configured through the Meraki Dashboard, Cisco's cloud management platform.
This guide walks you through the complete process of setting up a captive portal with Cisco Meraki, from network design and VLAN configuration through to portal customisation, security settings, and compliance with UK regulations.
The Business Case for Managed Guest Wi-Fi
Beyond the technical and legal considerations, a well-implemented captive portal delivers tangible business value. For hospitality and retail businesses, the splash page provides a branded touchpoint that reinforces your identity and can be used to promote current offers, loyalty programmes, or upcoming events. For corporate offices, a professional guest Wi-Fi experience reflects positively on your organisation — visitors who can connect quickly and reliably to a well-designed network form a more favourable impression than those left struggling with handwritten passwords or open networks that trigger security warnings on their devices.
The data collected through captive portals also provides valuable insights. Footfall patterns, peak usage times, average visit duration, and repeat visitor frequency can all be derived from guest Wi-Fi analytics without requiring any additional hardware or software. Retail businesses in particular can use this data to optimise staffing levels, measure the effectiveness of marketing campaigns, and understand customer behaviour across multiple locations. When aggregated across an estate of shops or branches, this intelligence becomes a powerful strategic asset that informs decisions well beyond the IT department.
Why You Need a Captive Portal
Before diving into the technical setup, it is important to understand why a captive portal is necessary rather than simply broadcasting an open Wi-Fi network for guests. There are four primary reasons: legal compliance, network security, bandwidth management, and brand presentation.
From a legal perspective, UK law requires that if your internet connection is used for illegal activity — such as downloading pirated content or accessing illegal material — you could potentially be held liable if you cannot demonstrate who was using your connection at the time. A captive portal that requires registration or acceptance of terms creates a log of who accessed your network and when, providing an audit trail that protects your organisation.
From a security perspective, an open Wi-Fi network is an invitation for attackers. Without a captive portal and proper network segmentation, anyone who connects to your Wi-Fi could potentially access internal resources, conduct man-in-the-middle attacks on other users, or use your network as a launchpad for attacks against external targets. A captive portal combined with VLAN isolation ensures that guest devices are contained in a separate network segment with internet access only.
Bandwidth Management and Fair Usage
Without controls in place, a single guest streaming high-definition video or downloading large files can consume a disproportionate share of your internet bandwidth, degrading the experience for every other user on the network — including your own staff. A captive portal works in conjunction with bandwidth management policies to enforce fair usage, ensuring that guest access does not come at the expense of business-critical operations. Meraki's Group Policy feature allows you to apply specific bandwidth limits, content filtering rules, and application prioritisation settings to guest traffic, giving you fine-grained control over how your internet capacity is shared between corporate and guest users.
The brand presentation aspect should not be underestimated either. Your captive portal splash page is often the first digital interaction a visitor has with your organisation. A professionally designed page featuring your logo, brand colours, and a welcoming message creates a positive impression, whilst a generic or poorly formatted page — or worse, no captive portal at all — suggests a lack of attention to detail that can undermine confidence in your broader IT capabilities and professionalism.
While there is no specific UK law that mandates captive portals for guest Wi-Fi, several regulations create practical requirements that make them necessary. The Investigatory Powers Act 2016 requires telecommunications operators (which can include businesses providing Wi-Fi) to retain certain communications data. UK GDPR requires that if you collect personal data through a captive portal (such as email addresses or names), you must have a lawful basis for processing, provide a privacy notice, and protect the data appropriately. The Digital Economy Act 2017 places obligations on ISPs regarding copyright infringement, which can extend to businesses providing internet access to guests.
Step 1: Network Design and VLAN Configuration
The first step in setting up a Meraki captive portal is designing the network architecture to properly isolate guest traffic. This requires creating a dedicated VLAN for guest Wi-Fi that is completely separated from your corporate network.
In the Meraki Dashboard, navigate to your network and create a new SSID dedicated to guest access. Meraki access points support up to 15 SSIDs per radio, so you have plenty of capacity to add a guest network alongside your corporate SSID. Name the SSID something professional and identifiable — your company name followed by "Guest" is a common convention, such as "Cloudswitched Guest."
Configure the guest SSID to use a dedicated VLAN. In the Meraki Dashboard under Wireless > Configure > Firewall & traffic shaping, assign the guest SSID to a VLAN that is different from your corporate VLAN. This VLAN should be configured on your switch and firewall to have internet access only, with no routes to any internal network segments. The Meraki Dashboard makes this straightforward — you can define Layer 3 and Layer 7 firewall rules that restrict guest traffic to internet-bound traffic only.
Bandwidth Limits
To prevent guests from consuming all your available bandwidth, configure per-client bandwidth limits on the guest SSID. A reasonable limit for most businesses is 5-10 Mbps per client, which is sufficient for web browsing, email, and video conferencing but prevents any single guest from degrading the experience for others or impacting your corporate internet performance.
When determining appropriate bandwidth limits, consider the primary use cases for your guest network. If visitors primarily need to check email and browse the web, 5 Mbps per client is more than adequate. If your guests regularly participate in video conferences — common in serviced offices, co-working spaces, and conference venues — you should allocate at least 10 Mbps per client to ensure acceptable video quality. For event venues hosting large gatherings, consider implementing a total SSID bandwidth cap to prevent guest traffic from overwhelming your upstream internet connection, regardless of the per-client limit. Meraki's traffic shaping also allows you to prioritise certain application categories over others, so you can ensure that web browsing and email always work smoothly even if a guest is attempting to download a large file in the background.
| Setting | Recommended Value | Purpose |
|---|---|---|
| Guest VLAN ID | 100 (or any unused ID) | Isolates guest traffic from corporate network |
| Per-client bandwidth limit | 5-10 Mbps down / 2-5 Mbps up | Prevents bandwidth abuse |
| Per-SSID bandwidth limit | 50-100 Mbps total | Caps total guest bandwidth usage |
| Client isolation | Enabled | Prevents guests from seeing each other |
| Session timeout | 8-24 hours | Forces re-authentication periodically |
| DHCP lease time | 1-4 hours | Recycles IP addresses efficiently |
Step 2: Configuring the Captive Portal
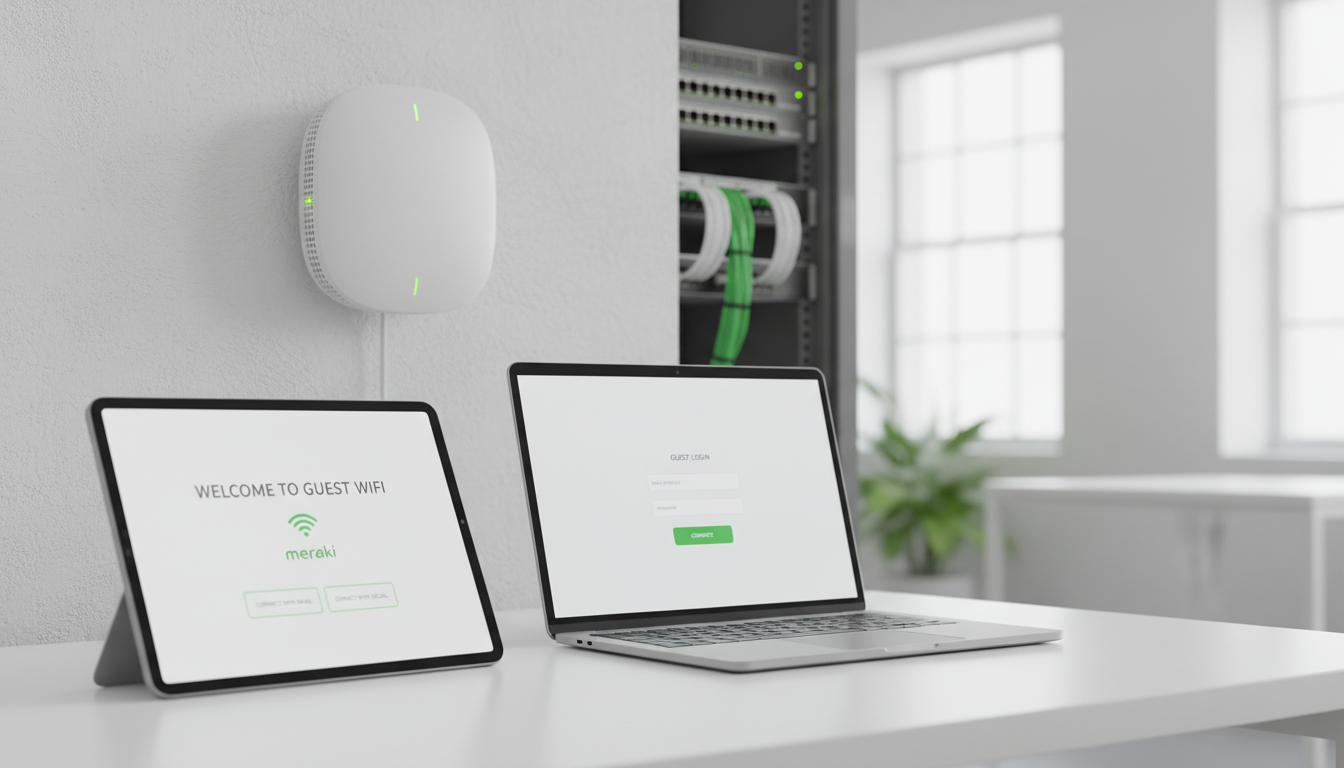
Meraki offers two types of captive portal: the built-in splash page and an external splash page hosted on your own server. For most UK businesses, the built-in splash page provides all the functionality needed and is far simpler to set up and maintain.
In the Meraki Dashboard, navigate to Wireless > Configure > Access control. Under the guest SSID, set the splash page type to "Click-through" for a simple terms acceptance page, or "Sign-on with" for authentication options including Meraki-hosted authentication, RADIUS, Active Directory, or social login (Facebook, Google).
The click-through option is the simplest: guests connect to the SSID, are redirected to a splash page showing your terms and conditions, and click a button to accept and gain access. This provides the legal protection of requiring terms acceptance without creating friction for visitors. The sign-on option adds authentication, requiring guests to enter credentials before accessing the network. This provides better audit trails but adds friction to the guest experience.
Portal Customisation
Meraki's splash page editor allows you to customise the appearance of your captive portal to match your brand identity. You can upload your company logo, set background colours and images, customise the text displayed to users, and include your full terms and conditions or a link to them. Take the time to create a professional-looking portal — it is often the first digital interaction a visitor has with your organisation, and a well-designed portal reinforces your brand.
Beyond visual branding, consider the user experience of your portal carefully. The splash page should load quickly, display correctly on both desktop and mobile devices, and require as few taps or clicks as possible to complete. Test your portal on a range of devices — iPhones, Android phones, Windows laptops, and Chromebooks — as each platform handles captive portal detection differently. Apple devices, for example, open captive portals in a small pop-up window that can display differently from a full browser, so ensure your splash page design works well at smaller viewport sizes. Meraki's splash page editor produces responsive designs by default, but custom HTML portals require careful mobile testing.
You should also consider the language and tone of your terms and conditions. Whilst the legal content must be accurate, presenting it in an accessible, plain-English format rather than dense legalese improves the visitor experience and increases the likelihood that guests actually read and understand what they are agreeing to. Include a clear summary of key points — what data you collect, how long it is retained, and what activities are prohibited — before the full terms, with the complete legal text available via a scrollable section or a link to a separate page.
Click-Through Captive Portal
- Simplest setup and lowest friction
- Guest accepts terms and gains immediate access
- No credentials required from guest
- Logs MAC address and acceptance time
- Suitable for retail, hospitality, waiting rooms
- No personal data collected (simpler GDPR compliance)
Sign-On Captive Portal
- Higher friction but better audit trail
- Guest must enter name, email, or social login
- Creates a record of who accessed the network
- Supports time-limited and sponsored access
- Better suited for corporate offices, conferences
- Requires GDPR-compliant data handling
Step 3: Security Configuration
With the captive portal configured, you need to ensure the security settings properly protect your corporate network from guest traffic. Meraki provides multiple layers of security that should all be configured.
Layer 3 firewall rules should deny all traffic from the guest VLAN to your corporate VLAN IP ranges. This is configured in the Meraki Dashboard under Wireless > Configure > Firewall & traffic shaping. Create explicit deny rules for your corporate network ranges (for example, deny all traffic to 192.168.1.0/24 if that is your corporate range) and allow traffic to the internet.
Content filtering should be enabled on the guest SSID to block access to categories of websites that could expose your organisation to legal risk. Meraki's built-in content filtering can block categories including adult content, malware distribution sites, peer-to-peer file sharing, and other undesirable content. This protects your organisation from liability if a guest uses your network to access inappropriate material.
Client isolation should be enabled to prevent guest devices from communicating with each other on the same VLAN. Without client isolation, one guest device could potentially attack or monitor traffic from another guest device on the same network segment.
DNS Security and Threat Protection
An often-overlooked security measure for guest networks is DNS-level protection. By configuring the guest VLAN to use a security-focused DNS service — either Meraki's built-in content filtering, Cisco Umbrella, or a third-party secure DNS provider — you can block guest devices from resolving known malicious domains. This prevents compromised guest devices from communicating with command-and-control servers and protects other guests from drive-by download attacks. Meraki's integration with Cisco Umbrella provides enterprise-grade DNS security that operates transparently, requiring no software installation on guest devices and adding no perceptible latency to their browsing experience.
You should also consider implementing a walled garden — a list of domains that guests can access before authenticating through the captive portal. This is necessary because some devices and applications need to reach specific URLs during the captive portal detection process. Apple devices, for example, probe captive.apple.com, whilst Android devices check connectivitycheck.gstatic.com. If these domains are blocked before authentication, devices may fail to detect the captive portal correctly, leaving guests unable to connect. Meraki automatically handles the most common captive portal detection URLs, but custom implementations may require manual walled garden configuration to ensure reliable operation across all device types.
Step 4: GDPR Compliance for Guest Wi-Fi Data
If your captive portal collects any personal data — names, email addresses, phone numbers, or even MAC addresses that can be linked to individuals — you must comply with UK GDPR. This means having a lawful basis for processing (legitimate interest or consent are most common), providing a clear privacy notice on the splash page, implementing appropriate security measures to protect the data, and defining a retention period after which the data is deleted.
Meraki's splash page allows you to include your privacy notice text or a link to your full privacy policy. Your privacy notice should explain what data is collected, why it is collected, how long it will be retained, who it may be shared with, and how guests can exercise their data protection rights (access, erasure, etc.).
Configure a data retention period that is proportionate to your purposes. If you are collecting data purely for network security and audit trail purposes, a retention period of 30 to 90 days is generally considered proportionate. If you are collecting email addresses for marketing purposes (with consent), you may retain them longer, but you must have obtained explicit opt-in consent for this purpose — a pre-ticked checkbox is not valid consent under UK GDPR.
Practical GDPR Implementation Steps
Implementing GDPR compliance for your guest Wi-Fi involves several practical steps beyond the privacy notice. First, ensure that your Meraki Dashboard access is restricted to authorised personnel only, as the dashboard contains guest connection data that constitutes personal data under GDPR. Enable two-factor authentication for all dashboard administrators and review access permissions regularly. Second, configure automatic data purging in line with your stated retention period — Meraki retains client data for up to one year by default, so you may need to implement a manual process or automated script to purge data earlier if your privacy notice promises a shorter retention period.
Third, prepare a process for handling Data Subject Access Requests (DSARs). Under UK GDPR, individuals have the right to request a copy of all personal data you hold about them, including guest Wi-Fi connection logs. You should be able to search your Meraki Dashboard by MAC address or, if you collected names and email addresses, by those identifiers. Document this process so that any DSAR can be fulfilled within the statutory one-month deadline. Finally, if you use a third-party analytics service that processes guest Wi-Fi data, ensure that a data processing agreement is in place and that the service complies with UK data protection standards.
Multi-Site Deployment with Meraki
One of Meraki's greatest strengths is its cloud management model, which makes deploying captive portals across multiple sites trivially simple. Configuration templates in the Meraki Dashboard allow you to define your guest Wi-Fi settings once and apply them to every site in your network. When you update the captive portal design, terms and conditions, or security settings, the changes propagate to all sites automatically.
For UK businesses with multiple offices, retail locations, or branches, this centralised management is transformative. A consistent guest Wi-Fi experience across all locations reinforces your brand, while centralised security policies ensure that every site meets the same compliance standards. New sites can be brought online in minutes — simply plug in a Meraki access point, and it automatically downloads the configuration from the cloud, including the captive portal settings.
Meraki also provides centralised reporting across all sites, showing guest Wi-Fi usage, authentication events, bandwidth consumption, and security incidents. This visibility allows you to monitor your guest network health across your entire estate from a single dashboard, identifying sites with unusual patterns or capacity issues before they affect the guest experience.
Configuration Templates and Consistency
Meraki's configuration templates deserve special attention for multi-site deployments. A template defines the complete configuration for a network type — including SSID names, captive portal settings, security rules, bandwidth limits, and content filtering policies — and binds to one or more networks. When you modify a template, every bound network inherits the change automatically. This approach eliminates the configuration drift that plagues traditional on-premises wireless deployments, where individual sites gradually diverge from the intended standard as local administrators make ad-hoc changes over time.
For organisations expanding rapidly — such as retail chains opening new locations or businesses acquiring new premises — templates reduce the time to deploy guest Wi-Fi from hours to minutes. A new Meraki access point simply needs to be plugged into the network and claimed into a template-bound network in the dashboard. It will automatically download the complete configuration, including the captive portal design, security policies, and bandwidth limits. The guest experience at the new location will be identical to every other site from day one, with no manual configuration required on site.
Analytics and Reporting Across Sites
Meraki's centralised analytics provide a powerful lens into guest Wi-Fi usage patterns across your entire estate. The Location Analytics feature, available on newer Meraki access point models, goes beyond basic connection data to track visitor presence and movement even for devices that do not connect to the network — by passively detecting Wi-Fi probe requests. This data can reveal foot traffic patterns, dwell times, and repeat visit rates across all your locations, providing insights that complement traditional footfall counting systems at a fraction of the cost. For multi-site retailers and hospitality businesses, this intelligence can inform everything from store layout decisions to marketing campaign timing and regional staffing strategies.
Need Help with Meraki Guest Wi-Fi?
Cloudswitched is a Cisco Meraki partner with extensive experience deploying captive portals for UK businesses across all sectors. From single-site setups to multi-site rollouts, we design, configure, and manage secure guest Wi-Fi solutions that comply with UK regulations and enhance your brand.
GET IN TOUCH
CloudSwitched
London-based managed IT services provider offering support, cloud solutions and cybersecurity for SMEs.


