Losing a critical file is a uniquely stressful experience for any UK business professional. Whether it is a financial spreadsheet accidentally overwritten before month-end closing, a client proposal deleted from a shared drive, a corrupted database that refuses to open, or an email attachment that was the only copy of a signed contract — the immediate impulse is to recover the file as quickly as possible with minimum disruption to the business. If your organisation has a properly configured cloud backup solution, that recovery is entirely achievable. But the process is not always as straightforward as pressing a single button.
This guide walks you through the practical process of recovering individual files from a cloud backup, covering the most common backup platforms used by UK businesses, the specific steps involved for different types of data, common pitfalls that can complicate recovery, and best practices for ensuring that your backups are always in a state that enables rapid, reliable restoration when you need it most urgently.
Understanding How Cloud Backup File Recovery Works
Before diving into specific recovery procedures, it helps to understand the fundamental mechanics of how cloud backup systems store and organise your data. Most enterprise cloud backup solutions take periodic snapshots of your protected data — the frequency varies from continuous real-time backup to scheduled intervals of every few hours, depending on your configuration and the data source being protected.
Each backup snapshot captures the state of your data at that specific point in time. This creates a timeline of recoverable points, often referred to as restore points or recovery points. When you need to recover a file, you navigate to the appropriate point in time — the most recent backup before the file was lost, corrupted, or incorrectly modified — and restore the specific file or files you need from that snapshot.
This point-in-time recovery capability is one of the most powerful features of cloud backup. Unlike simple file synchronisation services that mirror changes in real time, which means a deleted file is deleted everywhere almost immediately, cloud backup preserves historical versions for as long as your retention policy specifies. A file that was accidentally deleted three months ago can still be recovered if your backup retention period extends that far.
Many UK businesses mistakenly believe that OneDrive sync, Google Drive sync, or Dropbox file synchronisation constitutes a backup. It does not. Synchronisation services replicate changes across devices in real time — if a file is deleted or corrupted on one device, that deletion or corruption propagates to all synchronised copies within minutes. Whilst these services offer limited version history and recycle bin functionality, they do not provide the comprehensive point-in-time recovery, extended retention, and granular restore capabilities that a proper backup solution delivers.
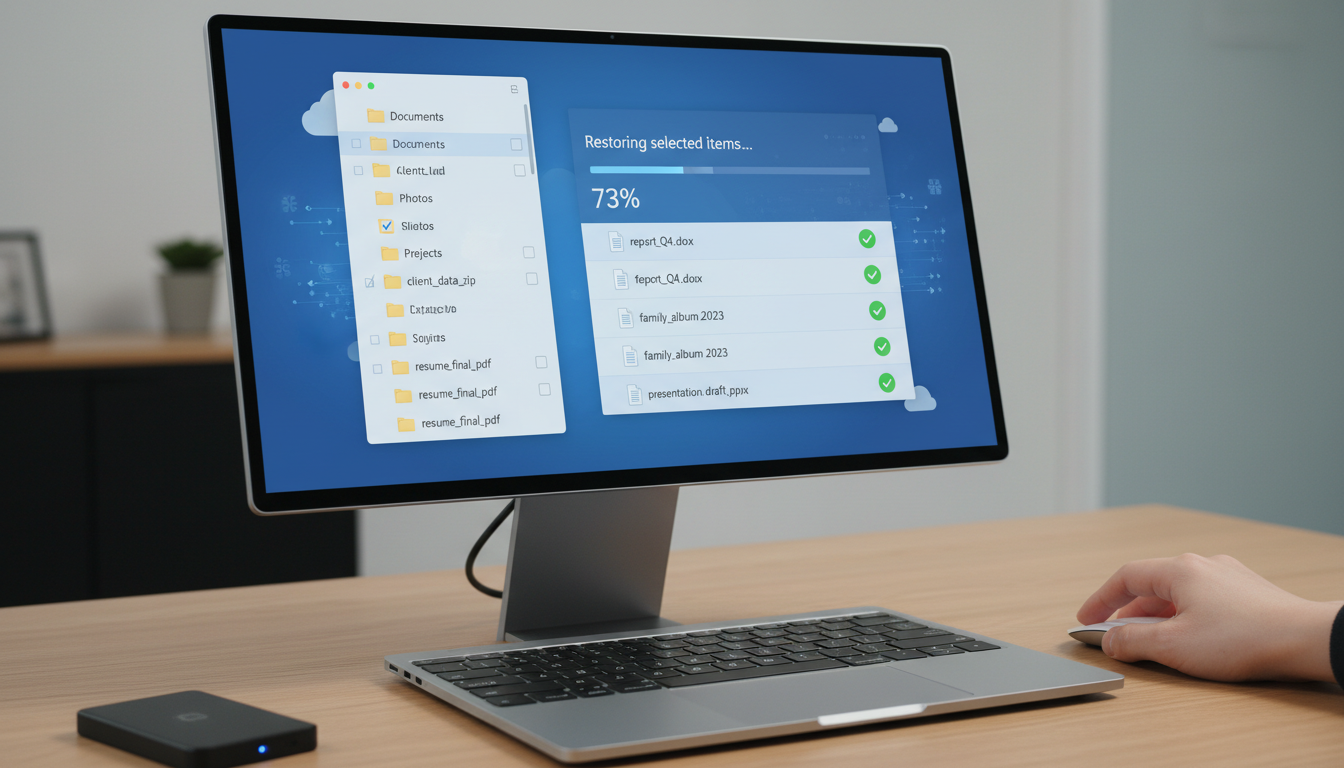
Recovery from Microsoft 365 Cloud Backup
For organisations using third-party backup solutions for Microsoft 365 — such as Veeam Backup for Microsoft 365, Datto SaaS Protection, or Acronis Cyber Protect Cloud — the recovery process for individual files follows a broadly similar pattern regardless of the specific product.
Access the backup management console, which is typically a web-based dashboard. Navigate to the user, mailbox, or SharePoint site from which you need to recover data. Browse the available restore points — these are listed chronologically, showing you every backup snapshot available for that data source. Select the restore point that precedes the data loss event. Within that restore point, navigate through the folder structure to locate the specific file, email, or item you need. Select the item and choose your restore option — most solutions offer the choice to restore to the original location, which overwrites the current version, or to download the file to a local machine for manual placement.
When restoring files, you will typically have several options for the restoration target. Restoring to the original location replaces the current version of the file with the backed-up version — useful when a file has been corrupted or incorrectly modified and you want to overwrite it with a known good copy. Restoring to an alternative location saves the recovered file to a different folder or location, preserving the current version of the file and allowing you to compare the two before deciding which to keep. Downloading to a local machine exports the recovered file from the backup platform to your computer, which is useful when you need to inspect the file before deciding where it should ultimately live. For most recovery scenarios, restoring to an alternative location first is the safest approach, as it preserves the current state of the target location whilst giving you access to the recovered data.
For email recovery, the process is similar but operates at the mailbox and folder level. You can typically browse through inbox folders, sent items, calendar entries, and contacts within any historical backup snapshot. This is particularly valuable for recovering emails that were permanently deleted beyond the native Exchange Online recoverable items window, or for restoring an entire mailbox structure after a catastrophic deletion event.
Recovery from Server and Endpoint Cloud Backup
For organisations backing up file servers, databases, and individual workstations to cloud backup platforms such as Datto SIRIS, Veeam Cloud Connect, Acronis Cyber Protect, or Azure Backup, the individual file recovery process depends on the type of backup being used.
Image-based backup solutions take complete snapshots of entire volumes or disks, capturing every file in a single backup job. To recover an individual file from an image backup, you typically mount the backup snapshot as a virtual drive using the backup console. This makes the entire contents of the backed-up volume browsable as if it were a locally attached disk, from which you can navigate to and copy the specific files you need. This mount-and-browse approach is extremely powerful because it allows you to recover any file from any point in time without needing to restore an entire server or volume.
File-level backup solutions back up individual files and folders based on selection policies defined by your IT team or managed service provider. These policies determine which directories are included in the backup, which file types are captured, and what schedule the backup follows. Recovery is straightforward — navigate to the file in the backup catalogue, select the desired version, and restore it to the original location or an alternative path. File-level backup typically offers faster granular recovery because you are working directly with individual files rather than mounting entire disk images.
Step-by-Step Recovery Process
Regardless of the specific backup platform, the following structured process helps ensure successful recovery and minimises the risk of further complications.
| Step | Action | Critical Considerations |
|---|---|---|
| 1. Identify the Loss | Determine exactly what was lost, when, and from where | Precision here saves significant time during recovery |
| 2. Stop Further Changes | Prevent additional modifications to the affected location | Ongoing changes can complicate restore point selection |
| 3. Check Native Recovery | Verify if recycle bin or version history can resolve it first | Native tools are faster if the deletion is recent enough |
| 4. Access Backup Console | Log into the backup management dashboard | Ensure you have appropriate restore permissions |
| 5. Select Restore Point | Choose the backup snapshot from before the loss event | Select the most recent clean backup, not the latest overall |
| 6. Locate and Restore | Navigate to the file and initiate restoration | Consider restoring to an alternate location first to verify |
| 7. Validate and Confirm | Verify the restored file is complete and correct | Open the file, check contents, confirm with the requester |
Understanding Recovery Time and Recovery Point Objectives
Two critical metrics govern backup and recovery planning: the Recovery Time Objective (RTO) and the Recovery Point Objective (RPO). The RTO defines the maximum acceptable time between a data loss event and the completion of recovery — how long can your business tolerate being without the lost data before operations are materially impacted? The RPO defines the maximum acceptable age of the backup from which data is restored — how much data can you afford to lose in terms of the time gap between your most recent backup and the moment of loss? For individual file recovery, most businesses require an RTO measured in minutes to hours and an RPO of no more than 24 hours. Configure your backup frequency and test your restore times against these objectives to ensure your backup solution can actually deliver the recovery performance your business requires when a real incident occurs.
The chart below shows typical individual file recovery times across the most common cloud backup platforms used by UK businesses, based on our operational experience managing hundreds of recovery scenarios. These figures assume a properly configured backup with adequate bandwidth and represent the time from initiating the restore to having the file available for use.
These recovery times demonstrate why choosing the right backup platform for each data source matters. A platform that delivers three-minute email recovery but requires thirty minutes for a database restore may be perfectly adequate for an organisation whose email is mission-critical but whose databases change infrequently. Conversely, a business running real-time transaction processing needs the fastest possible database recovery, even if email recovery is slightly slower. Aligning your backup platform selection with your specific recovery priorities ensures that the data most critical to your operations receives the fastest possible restoration.
Recovery from Cloud-Hosted Databases
Database recovery requires special consideration because databases are not simply files that can be copied and pasted. A database backup must capture a consistent snapshot of all tables, indexes, stored procedures, and data at a specific point in time — restoring individual tables from an inconsistent backup can create data integrity issues that cascade through your applications and reporting.
For databases hosted in Azure SQL, Amazon RDS, or similar cloud database services, the platform typically provides built-in point-in-time recovery capabilities. Azure SQL Database, for example, automatically maintains continuous backups and allows you to restore to any point in time within the configured retention period — typically 7 to 35 days depending on your service tier. To recover a specific table or subset of data, you restore the entire database to a new instance at the desired point in time, then extract and migrate only the specific data you need back to the production database.
For self-managed databases running on cloud virtual machines — such as SQL Server, MySQL, or PostgreSQL instances running on Azure VMs or AWS EC2 — recovery depends on your backup strategy. If you are using image-level VM backup through services like Azure Backup or Veeam, you can mount the VM backup image and access the database files directly. However, this requires careful handling to ensure the database is in a consistent state. For critical databases, implement application-aware backups that trigger a database consistency checkpoint before the snapshot is taken, or use native database backup tools like SQL Server backup alongside your VM-level backup for an additional layer of protection.
Always test database recovery procedures in a non-production environment before you need them in an emergency. A database restore that introduces inconsistencies or breaks application functionality can create a worse situation than the original data loss. Quarterly restore drills — where you recover a database to a test environment and verify data integrity and application functionality — build confidence and identify potential issues before they matter critically.
Building a Recovery-Ready Organisation
The most effective approach to file recovery is prevention and preparation. Implement a tiered backup strategy where your most critical and frequently changing data is backed up most frequently with the longest retention. Less critical or static data can tolerate less frequent backups and shorter retention periods. This tiered approach optimises both cost and recoverability, ensuring that the data you are most likely to need to recover is always available in the most recent possible state.
Consider implementing automated backup verification that periodically restores sample data to a temporary environment and validates its integrity without any manual intervention. Several modern backup platforms offer this capability natively — they automatically restore random files or database snapshots on a scheduled basis, verify that the data is intact and accessible, and report the results to your monitoring dashboard. This automated approach provides continuous confidence in your backup integrity without requiring staff to remember to perform manual test restores, which in practice are often deprioritised when other urgent work demands attention.
Train your staff on the correct procedure for reporting data loss incidents. The sooner your IT team or managed service provider is notified of a data loss event, the more options are available for recovery and the higher the probability of a successful outcome. Many organisations lose precious recovery time because employees attempt to resolve data loss themselves — searching through email attachments, asking colleagues for copies, or trying to recreate the data from memory — rather than immediately reporting the issue to the team that can perform a proper backup restoration.
Document your recovery procedures in a runbook that is accessible to your IT team or managed service provider at all times. The runbook should cover the specific steps for recovering different types of data from each backup platform in use, including login credentials for backup management consoles stored securely in your password manager, escalation contacts at your backup vendor for complex recovery scenarios, and estimated recovery time objectives for different data categories so that requesters have realistic expectations about how quickly their data can be restored.
Assessing your organisation's backup recovery readiness requires evaluating several key dimensions. The scores below represent the benchmarks we typically observe amongst UK businesses with mature, well-managed backup strategies — use them as a reference point when auditing your own recovery posture and identifying areas that require improvement.
Note that staff awareness consistently scores lowest across UK organisations. This reflects a common gap where IT teams configure excellent backup infrastructure but neglect to train end users on how to report data loss incidents promptly and effectively. Closing this gap through regular awareness sessions and clear internal communications can dramatically reduce the time between a data loss event and the initiation of a recovery procedure.
Common Recovery Pitfalls and How to Avoid Them
Several common mistakes can complicate or prevent successful file recovery. The most frequent pitfall is discovering that the backup does not cover the data source you need. This typically occurs when new file shares, cloud applications, or user accounts were added after the backup was initially configured, and nobody updated the backup policy to include them. Regular reviews of backup scope — at least quarterly — ensure that all critical data sources are protected.
Retention policy misalignment is a particularly dangerous gap. If your business needs the ability to recover files from six months ago — for example, to satisfy a regulatory enquiry, respond to a legal discovery request, or retrieve historical financial data — but your backup retention is configured for only 30 days, the data you need simply will not exist in your backup when you go looking for it. Review your backup retention periods against your actual business and regulatory requirements at least annually, and extend retention where necessary to ensure that recoverable data is available for as long as your business might realistically need it.
Another common issue is insufficient backup frequency for critical data. If your backup runs once daily at midnight but a user loses a full day of work at 5pm, the most recent backup may not contain the data they need. For high-value, frequently changing data, consider increasing backup frequency to multiple times per day or implementing continuous data protection for the most critical sources.
Restoring to the wrong location is a surprisingly common error that can overwrite current good data with older backup versions. Always restore to an alternative or temporary location first, verify the recovered files are correct and complete, and then move them to their intended destination manually. This simple precaution prevents the compounding problem of overwriting good data with outdated copies during a recovery operation.
Well-Prepared Recovery
- All data sources included in backup scope
- Appropriate backup frequency for data criticality
- Regular tested restores confirming backup integrity
- Clear documented recovery procedures for staff
- Restore to alternate location first then verify
- Backup retention aligned with business requirements
Common Recovery Failures
- Critical data sources not included in backup
- Once-daily backup missing same-day changes
- Backups never tested until a real recovery is needed
- No documented procedures causing delays and panic
- Restoring directly to original location risking overwrites
- Retention too short for compliance or business needs
Ensure Your Backups Are Recovery-Ready
Cloudswitched manages cloud backup solutions for UK businesses with a focus on recoverability. We configure, monitor, and regularly test your backups so that when you need to recover a file — or an entire system — the process is fast, reliable, and stress-free. Contact us to review your current backup and recovery posture.
Explore Cloud Backup Solutions
CloudSwitched
London-based managed IT services provider offering support, cloud solutions and cybersecurity for SMEs.


