Every business depends on its IT systems. When those systems go down — whether from hardware failure, ransomware, natural disaster, or human error — the clock starts ticking. Every minute of downtime costs money, erodes customer confidence, and threatens the viability of the organisation itself. For UK businesses, the question is not whether a disaster will occur but when, and whether you will be prepared to recover.
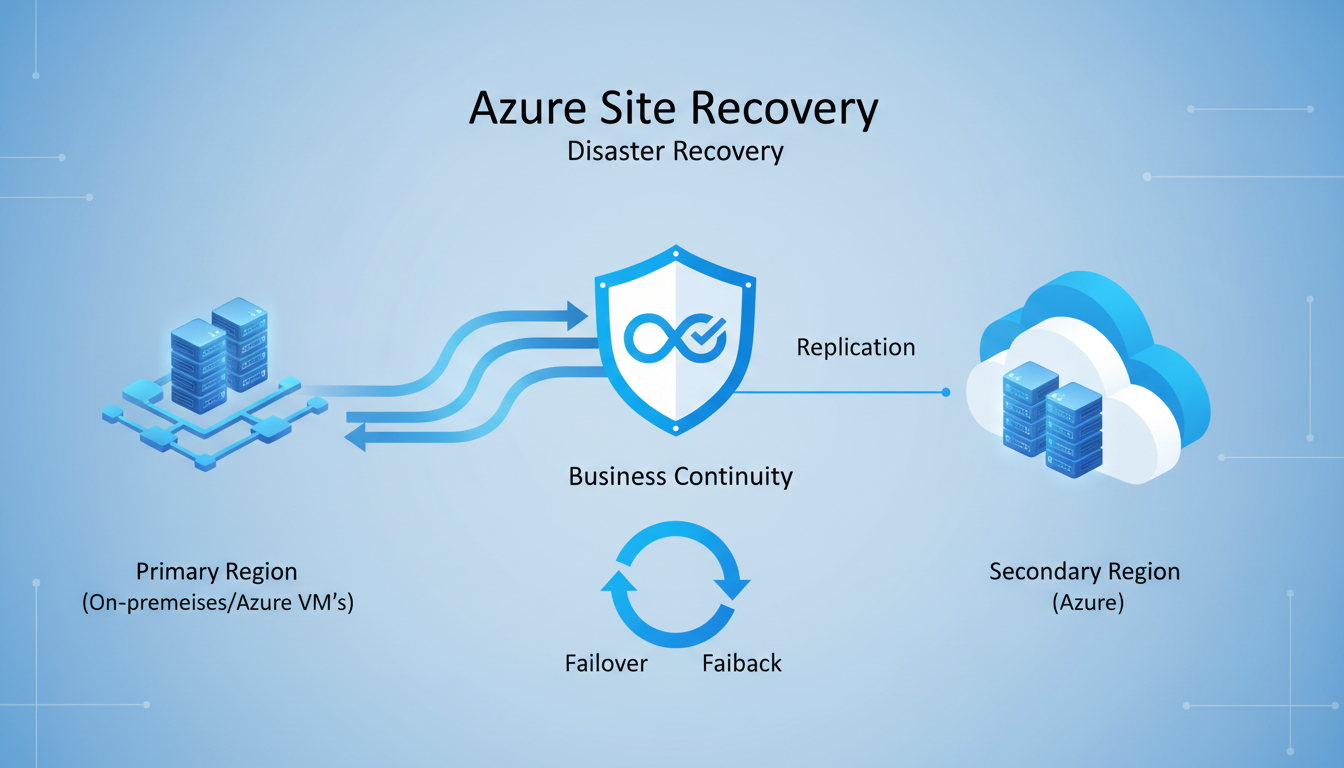
Azure Site Recovery (ASR) is Microsoft's disaster recovery service that enables businesses to replicate their on-premises and cloud-based workloads to Azure, providing the ability to fail over to the cloud when disaster strikes and fail back when the primary site is restored. It transforms disaster recovery from an expensive, complex undertaking into a manageable, affordable service that UK SMEs can implement without building a secondary data centre.
This guide walks you through the key concepts, planning considerations, and implementation steps for setting up Azure Site Recovery to protect your business-critical systems.
For UK organisations in particular, disaster recovery planning has taken on heightened importance in recent years. The rise in ransomware attacks targeting British businesses, combined with increasingly stringent regulatory requirements around operational resilience, means that having a robust, tested disaster recovery capability is no longer optional — it is a fundamental business requirement. The Financial Conduct Authority, the Prudential Regulation Authority, and sector-specific regulators all expect organisations to demonstrate that they can recover critical services within defined tolerances. The Telecommunications (Security) Act 2021 and the broader push towards operational resilience across regulated industries reinforce this expectation, making disaster recovery a board-level concern rather than a purely technical one.
Azure Site Recovery addresses these requirements by providing a cloud-based disaster recovery platform that is both technically capable and commercially accessible. Unlike traditional disaster recovery approaches that require significant capital expenditure on secondary infrastructure, ASR operates on a consumption-based model that aligns costs with actual usage. This makes enterprise-grade disaster recovery available to businesses that could never justify the expense of a dedicated secondary site. For a typical UK SME with ten to fifty employees, the cost of maintaining a warm standby site — including premises, hardware, power, cooling, and connectivity — could easily exceed fifty thousand pounds per year. ASR delivers comparable or superior protection for a fraction of that cost.
Understanding Azure Site Recovery
Azure Site Recovery works by continuously replicating your servers and workloads to Azure. Think of it as maintaining a constantly updated copy of your critical systems in the cloud, ready to be activated at a moment's notice. When your primary systems fail, you initiate a failover, and your replicated systems come online in Azure within minutes, allowing your business to continue operating while the primary site is repaired.
Key Concepts
The Recovery Point Objective (RPO) defines how much data you can afford to lose, measured in time. An RPO of one hour means you accept losing up to one hour of data in a disaster. Azure Site Recovery supports RPOs as low as 25 seconds for continuous replication, meaning you lose no more than 25 seconds of data — far better than traditional backup-based recovery, which typically has RPOs of 24 hours.
How ASR Replication Works
Understanding the replication mechanism helps clarify why ASR delivers such impressive RPO figures. For VMware and physical servers, ASR uses a process-based replication agent called the Mobility service. This agent intercepts disk writes at the operating system level and transmits them to a process server on your network. The process server compresses and encrypts the data before sending it to Azure over HTTPS. In Azure, the data is written to managed disks in the target region, creating crash-consistent recovery points every few minutes and application-consistent recovery points at configurable intervals. This continuous replication model means your Azure-hosted replica is always within seconds of your production environment.
For Hyper-V environments, the replication mechanism integrates directly with Hyper-V Replica technology, capturing changes at the hypervisor level. This approach is less intrusive than agent-based replication and typically requires fewer resources on the protected hosts. Both approaches support replication to any Azure region, giving you the flexibility to choose a recovery location that meets your data residency and latency requirements. Most UK businesses select the UK South or UK West Azure regions for their recovery vaults, ensuring that replicated data remains within the United Kingdom and complies with domestic data sovereignty expectations.
The replication process is designed to be minimally intrusive to production workloads. ASR uses change tracking and bandwidth throttling to ensure that replication traffic does not overwhelm your network or degrade application performance. For servers with high write rates — such as busy database servers or file servers handling large volumes of daily transactions — you can configure the process server to cache and batch replication data, smoothing out traffic spikes and reducing the impact on your production network. In practice, most businesses report negligible performance impact from ASR replication on their production workloads.
The Recovery Time Objective (RTO) defines how quickly your systems must be back online after a disaster. Azure Site Recovery typically achieves RTOs of two to fifteen minutes, depending on the number and complexity of the workloads being recovered. Compare this to rebuilding a physical server from backup, which can take hours or days.
The practical implications of these recovery metrics are significant for UK businesses across every sector. Consider a financial services firm processing client transactions: an RTO of two minutes versus two days represents the difference between a minor inconvenience and a potentially business-ending event. For healthcare organisations, rapid recovery of clinical systems can directly affect patient safety and care continuity. For manufacturing businesses, extended downtime on production control systems can result in spoiled materials, missed delivery commitments, and contractual penalties that far exceed the cost of disaster recovery protection.
Retail businesses face particular urgency during peak trading periods — a major outage during the Christmas rush or a promotional event could cost tens or hundreds of thousands of pounds in lost sales. Legal and professional services firms risk missing court deadlines and regulatory filing dates. The speed at which ASR can restore operations fundamentally changes the risk profile of IT-dependent businesses, transforming disaster recovery from a grudging insurance cost into a genuine competitive advantage.
It is worth noting that ASR supports both planned and unplanned failovers. Planned failovers — used during maintenance windows or anticipated disruptions such as severe weather warnings — ensure zero data loss by completing a final synchronisation before switching over. Unplanned failovers, triggered by unexpected outages, use the most recent recovery point and may result in minimal data loss within the RPO window. Having both options available gives businesses the flexibility to respond appropriately to different scenarios, whether that is a scheduled data centre maintenance window or an unexpected power failure.
Azure Site Recovery (Cloud DR)
- RPO as low as 25 seconds
- RTO of 2-15 minutes typical
- No secondary data centre required
- Pay only for storage and compute when used
- Automated failover and failback
- Built-in recovery plan orchestration
- Regular non-disruptive testing
- Scales with your infrastructure
Traditional DR (Secondary Site)
- RPO of 1-24 hours typical
- RTO of 4-48 hours typical
- Requires physical secondary data centre
- Constant hardware and facility costs
- Manual failover procedures
- Complex coordination required
- Disruptive and expensive to test
- Fixed capacity, expensive to expand
Planning Your Azure Site Recovery Deployment
Identify Critical Workloads
Not every system needs the same level of disaster recovery protection. Start by categorising your workloads by criticality. Your line-of-business applications, database servers, and file servers are likely tier one — they must be recovered immediately. Email and collaboration tools (if hosted on-premises) are tier two. Development environments, test servers, and archive systems are tier three and may not need ASR protection at all.
This tiering approach ensures you invest DR resources where they deliver the most value. Protecting every server equally is wasteful; protecting only the most critical systems is pragmatic and cost-effective.
Conducting a Business Impact Analysis
The workload tiering exercise should be informed by a formal business impact analysis (BIA). A BIA systematically evaluates the consequences of disruption to each business function and the IT systems that support them. For each system, determine the financial impact of downtime per hour, the regulatory implications of extended outages, the reputational damage that could result, and any contractual obligations such as service level agreements with your own customers. This analysis provides the quantitative foundation for your disaster recovery investment — without it, you are guessing at priorities.
Engage department heads and key stakeholders in this process — they understand the operational dependencies that IT teams may not fully appreciate. A warehouse management system that appears non-critical from an IT perspective may be absolutely essential to fulfilling next-day delivery commitments that underpin significant revenue contracts. Similarly, a seemingly minor internal application may be the only mechanism for regulatory reporting that must be completed within strict deadlines. The BIA process often reveals surprising dependencies and priorities that would otherwise be missed.
Document the interdependencies between systems as part of your BIA. Modern business applications rarely operate in isolation. Your CRM may depend on a database server, a file server for document storage, an email server for notifications, and an authentication server for user access. All of these dependencies must be protected and recovered together for the application to function correctly. ASR recovery plans allow you to model these dependencies and ensure that systems are recovered in the correct sequence, preventing situations where an application comes online but cannot function because a supporting service has not yet been restored.
| Tier | Workload Examples | Target RPO | Target RTO | ASR Protection |
|---|---|---|---|---|
| Tier 1 (Critical) | ERP, CRM, databases, file servers | < 5 minutes | < 15 minutes | Continuous replication |
| Tier 2 (Important) | Email (on-prem), intranet, printing | < 1 hour | < 4 hours | Continuous replication |
| Tier 3 (Non-Critical) | Development, testing, archives | < 24 hours | < 24 hours | Backup only (no ASR) |
Network and Bandwidth Requirements
Azure Site Recovery requires sufficient bandwidth to replicate your data to Azure. The initial replication copies all data from your on-premises servers to Azure storage, which can be substantial — a server with 500GB of data needs 500GB transferred to Azure. After the initial sync, only changes (delta replication) are transmitted, which is typically much smaller.
For a UK business with a 100Mbps internet connection, the initial replication of a 500GB server takes approximately 12 hours. Delta replication for a moderately active server typically requires 5-20Mbps of sustained bandwidth. Ensure your internet connection has sufficient headroom to handle replication traffic without impacting business operations. Many businesses schedule the initial bulk replication during evenings or weekends to avoid daytime bandwidth contention.
Optimising Network Performance for Replication
For businesses with limited bandwidth or large volumes of data to replicate, several strategies can optimise the replication process. Azure ExpressRoute provides a dedicated private connection between your on-premises network and Azure, bypassing the public internet entirely. This delivers more consistent bandwidth, lower latency, and improved security for replication traffic. Whilst ExpressRoute involves additional monthly costs — typically starting from several hundred pounds per month for a 50Mbps circuit — it is a worthwhile investment for businesses with substantial replication requirements or strict compliance needs around data in transit. Several UK telecommunications providers offer ExpressRoute connectivity, including BT, Vodafone, and Colt, with points of presence in London, Manchester, and other major UK cities.
If ExpressRoute is not feasible for your organisation, consider implementing Quality of Service (QoS) policies on your network to prioritise replication traffic during off-peak hours and throttle it during business hours. ASR includes built-in bandwidth throttling that can be configured on the process server, allowing you to set maximum replication bandwidth during specific time windows. This ensures that replication proceeds without compromising the performance of business-critical applications that share the same internet connection. A well-configured throttling policy can make the difference between replication that disrupts daily operations and replication that runs unobtrusively in the background.
For the initial replication of very large servers, Azure supports offline seeding using Azure Data Box. You export the initial data to a physical Data Box device, ship it to an Azure data centre, and the data is loaded directly into your Azure storage account. Subsequent delta replication then occurs over the network as normal. This approach can reduce the initial replication time from weeks to days for organisations with large datasets and limited bandwidth, and avoids the prolonged bandwidth impact of transferring hundreds of gigabytes or even terabytes over your internet connection.
Implementation Steps
Step 1: Set Up the Azure Environment
Create a Recovery Services vault in Azure, selecting a UK region (UK South or UK West) for data residency compliance. The vault is the central management point for all your ASR-protected workloads. Configure the vault's replication policy, specifying the recovery point retention period and application-consistent snapshot frequency.
Step 2: Deploy the Configuration Server
For protecting on-premises VMware or physical servers, deploy the ASR configuration server on a dedicated on-premises virtual machine. This server coordinates communication between your on-premises environment and Azure, manages replication, and handles failover orchestration. For Hyper-V environments, the Azure Site Recovery Provider is installed directly on your Hyper-V hosts.
Step 3: Enable Replication
Select the servers you want to protect and enable replication. ASR installs the Mobility service agent on each protected server, which captures disk writes and transmits them to Azure. The initial replication begins automatically, copying the full disk contents to Azure storage. Monitor the replication progress through the Azure portal — initial sync can take hours to days depending on data volume and bandwidth.
Step 4: Create Recovery Plans
Recovery plans define the order in which your servers are brought online during a failover. You might configure your domain controller to start first, followed by database servers, then application servers, then web servers. Recovery plans can include custom scripts — for example, updating DNS entries or starting specific services — that run automatically during failover.
Recovery Plan Best Practices
Well-designed recovery plans are the backbone of an effective ASR deployment. Beyond sequencing server start-up, recovery plans should incorporate pre-actions and post-actions that automate the operational tasks required during failover. Pre-actions might include notifying your IT team via automated alerts, updating load balancer configurations, or disabling scheduled tasks that should not run during disaster recovery. Post-actions might include verifying application health checks, updating DNS records to point to the Azure-hosted systems, sending user notifications with connection instructions, and configuring monitoring for the recovered environment.
Group related servers into recovery groups within your plan. Servers in the same group start simultaneously, whilst groups execute sequentially. For example, Group 1 might contain your domain controllers and DNS servers, Group 2 your database servers, Group 3 your application servers, and Group 4 your web servers and remote access gateways. This layered approach ensures that foundational services are available before dependent services attempt to start, preventing cascading failures during recovery. Test the sequencing thoroughly — an application server that starts before its database server is available will often crash or enter a degraded state that requires manual intervention to resolve.
Consider creating multiple recovery plans for different scenarios. A full-site failover plan recovers everything, but you may also need plans for partial failures — recovering just your database tier, or just your customer-facing applications. Having pre-built plans for common failure scenarios reduces decision-making time during a crisis, when stress and urgency can lead to mistakes. Each recovery plan should be documented with clear trigger criteria, authorisation requirements, and expected outcomes so that any qualified member of your IT team can initiate a failover confidently.
Testing Your Disaster Recovery
A disaster recovery plan that has never been tested is not a plan — it is a hope. Azure Site Recovery includes a test failover feature that allows you to spin up your replicated servers in an isolated Azure network without affecting your production environment or replication. This means you can test your disaster recovery at any time without risk or disruption.
Schedule test failovers at least quarterly. During each test, verify that servers start in the correct order, applications function correctly, data is intact, and users can connect to the recovered environment. Document the results and address any issues discovered. The NCSC recommends regular DR testing as part of its resilience guidance for UK organisations.
Developing a Comprehensive Testing Programme
Beyond basic failover testing, develop a comprehensive DR testing programme that exercises different aspects of your recovery capability. Tabletop exercises walk key personnel through disaster scenarios without actually failing over, testing communication procedures, decision-making processes, and role clarity. Technical recovery tests validate that ASR failover works correctly and that applications function in the Azure environment. Full simulation exercises combine both elements, testing the entire disaster response from initial incident detection through to business resumption under realistic conditions.
Each test should produce a detailed report documenting what worked, what failed, what took longer than expected, and what improvements are needed. Track key metrics across tests — failover time, application recovery time, data integrity verification results, and user reconnection time — to identify trends and measure improvement over successive exercises. Maintain a living DR runbook that is updated after every test with lessons learned and procedural refinements. This runbook becomes an invaluable resource during an actual disaster, providing step-by-step guidance when your team is under pressure.
Involve your business users in testing, not just your IT team. A technically successful failover means nothing if users cannot access the recovered systems, connect their applications, or perform their critical business processes from the recovery environment. User acceptance testing during DR exercises ensures that your recovery procedures deliver a genuinely functional working environment, not just running servers. Schedule testing during normal business hours at least once per year to validate the real-world user experience of working in the recovery environment.
Azure Site Recovery costs approximately £19 per protected server per month for the ASR licence, plus Azure storage costs for the replicated data (typically £15-30 per server per month depending on data volume). During normal operation, you only pay for storage — compute costs are only incurred during an actual failover or test failover. For a small business protecting five critical servers, the total monthly cost is typically £150-250 — a fraction of the cost of maintaining a physical secondary site and far less than the cost of unplanned downtime.
Failover and Failback Procedures
When disaster strikes, initiating failover is straightforward. From the Azure portal, select the recovery plan and click "Failover." Azure spins up virtual machines from the replicated data, executes any custom scripts in the recovery plan, and brings your systems online in the cloud. Users connect to the Azure-hosted systems — typically via VPN or Azure Virtual Desktop — and continue working while the primary site is repaired.
Failback — returning operations to the primary site once it is restored — follows a similar process in reverse. ASR replicates changes made during the failover period back to the on-premises servers, and when synchronisation is complete, you execute a planned failover to move operations back to the primary site.
Communication During Disaster Recovery
Technical recovery is only half the battle during a disaster. Equally important is communicating effectively with stakeholders throughout the incident. Prepare communication templates in advance — for staff, customers, suppliers, and regulators — that can be quickly customised and distributed when an incident occurs. Your communication plan should define who is responsible for each audience, what channels will be used (bearing in mind that your usual email system may be unavailable), and what information should be shared at each stage of the incident lifecycle.
For UK businesses subject to regulatory oversight, understand your notification obligations before a disaster occurs. The ICO requires notification of personal data breaches within 72 hours where there is a risk to individuals' rights and freedoms. Financial services firms have specific reporting obligations to the FCA under the Senior Managers and Certification Regime. Healthcare organisations must notify NHS Digital of certain incidents. Having pre-drafted notification templates and clear escalation procedures ensures that you meet these obligations even under the pressure of an active incident, when time and attention are at a premium.
Ongoing Management and Continuous Improvement
Deploying Azure Site Recovery is not a one-time project — it requires ongoing management to remain effective as your environment evolves. Monitor replication health daily through the Azure portal or configure automated alerts for replication failures, high RPO threshold breaches, connectivity issues, and agent health warnings. As your on-premises environment changes — new servers deployed, existing servers decommissioned, applications migrated, network configurations updated — your ASR configuration must be updated to reflect the current state of your infrastructure.
Review your disaster recovery strategy at least annually, or whenever significant changes occur in your business or IT environment. A business acquisition, new regulatory requirement, office relocation, or significant growth in data volumes can all affect your DR requirements and may necessitate changes to your ASR configuration, recovery plans, or Azure capacity reservations. Treat your disaster recovery capability as a living system that evolves with your business, not as a static insurance policy that can be configured once and forgotten.
Consider implementing Azure Monitor and Azure Automation to enhance your ASR management capabilities. Azure Monitor can track replication lag, storage consumption, and failover readiness across your entire protected estate, providing dashboards and alerts that give your IT team real-time visibility into your DR posture. Azure Automation can schedule regular test failovers, generate compliance reports, and perform routine maintenance tasks automatically, reducing the operational burden on your team and ensuring that nothing falls through the cracks. For businesses working with a managed service provider, ensure that DR monitoring and management are explicitly included in the service agreement with clear responsibilities and reporting cadences.
Protect Your Business With Azure Site Recovery
Cloudswitched designs and implements Azure Site Recovery solutions for UK businesses, providing enterprise-grade disaster recovery without the complexity or cost of a secondary data centre. From initial assessment and planning to deployment, testing, and ongoing management, we ensure your critical systems are protected and recoverable. Contact us to discuss your business continuity needs.
GET IN TOUCH
CloudSwitched
London-based managed IT services provider offering support, cloud solutions and cybersecurity for SMEs.


